Apasih.my.id – Halo sobat apasih! Kembali lagi sama mimin nih, Pada artikel kali ini mimin akan memberikan tutorial kepada kamu tentang bagaimana cara konfigurasi WP Rocket Nginx di aaPanel. Seperti kita yang kita ketahui untuk server yang menggunakan Apache, OpenLiteSpeed, tentunya kamu dapat menggunakan .htaccess untuk mengaktifkan selanjutnya aturan konfigurasi akan ditulis secara otomatis.
Akan tetapi berbeda jika kamu menggunakan server Nginx. Kamu perlu membuat file conf dan memasukkannya ke dalam file konfigurasi Nginx, WP Rocket akan bekerja secara efektif di server Nginx.
Meskipun konfigurasi ini tidak diperlukan, dengan cara ini memungkinkan Nginx untuk langsung mendistribusikan file yang sebelumnya di cache tanpa memanggil WordPress atau file PHP apa pun. Secara logikanya file html tersebut akan tercache langsung dan dalam konfigurasi ini, itu juga menambahkan header ke CSS, JS, dan gambar cache browser.
Daftar isi
Cara Konfigurasi WP Rocket Nginx
Sebelum kita melakukan konfigurasi WP Rocket Nginx, yang harus kamu lakukan mengenal terlebih dahulu Satellite WP. Karena pada tutorial kali ini mimin menggunakan bantuan konfigurasi yang ada di GitHub dan kamu bisa melihatnya secara langsung pada link dibawah ini:
1. Buat File Konfigurasi wp-rocket.conf
Pertama, kamu perlu membuat file konfigurasi untuk ditambahkan. Mimin akan selalu membuat file yang disimpan di publik agar lebih mudah. Disini mimin menggunakan kontrol aaPanel sehingga lokasi penyimpanan file berada, /www/wwwroot/apasih.my.id/, lalu setelah itu buat file wprocket.conf dan masukkan cuplikan kode bawah ini.
###################################################################################################
# Rocket-Nginx
#
# Rocket-Nginx is a NGINX configuration to speedup your WordPress
# website with the cache plugin WP-Rocket (http://wp-rocket.me)
#
# Author: Maxime Jobin
# URL: https://github.com/maximejobin/rocket-nginx
#
# Tested with WP-Rocket version: 2.8.11
# Tested with NGINX: 1.11.3 (mainline)
#
# Version 1.2
#
###################################################################################################


location / {
try_files $uri $uri/ /index.php?$args;
}


# Add debug information into header
set $rocket_debug 0;


# HTTP Strict Transport Security (to overwrite default)
set $rocket_hsts_value "";


# WP-Content directory (leave as is if you did not alter WordPress' default value)
set $rocket_wpcontent_directory "$document_root/wp-content";


# WP-Content URL (leave as is if you did not alter WordPress' default value)
set $rocket_wpcontent_url "/wp-content";


###################################################################################################
# Do not alter theses values
#
set $rocket_bypass 1;                # Should NGINX bypass WordPress and call cache file directly ?
set $rocket_encryption "";            # Is GZIP accepted by client ?
set $rocket_file "";                # Filename to use
set $rocket_is_bypassed "No";        # Header text added to check if the bypass worked or not. Header: X-Rocket-Nginx-Bypass
set $rocket_reason "";                # Reason why cache file was not used. If cache file is used, what file was used
set $rocket_https_prefix "";        # HTTPS prefix to use when cached files are using HTTPS
set $rocket_hsts 0;                    # Is HSTS is off (0) by default. Will be turned on (1) if request is HTTPS


# HSTS Default value : 1 year,include subdomains.
set $rocket_hsts_value_default "max-age=31536000; includeSubDomains";


###################################################################################################
# PAGE CACHE
#

# Is GZIP accepted by client ?
if ($http_accept_encoding ~ gzip) {
    set $rocket_encryption "_gzip";
}

# Is SSL request ?
if ($https = "on") {
    set $rocket_https_prefix "-https";
    set $rocket_hsts 1;
}

# If HSTS value is not set, use default value
if ($rocket_hsts_value = "") {
    set $rocket_hsts_value "$rocket_hsts_value_default";
}

# If HSTS is disabled, unset HSTS set for Rocket-Nginx configuration
if ($rocket_hsts = "0") {
    set $rocket_hsts_value "";
}

# File/URL to return IF we must bypass WordPress
# index-mobile.html
# index-mobile-https.html
set $rocket_end "/cache/wp-rocket/$http_host/$request_uri/index$rocket_https_prefix.html$rocket_encryption";
set $rocket_url "$rocket_wpcontent_url$rocket_end";
set $rocket_file "$rocket_wpcontent_directory$rocket_end";
set $rocket_mobile_detection "$rocket_wpcontent_directory/cache/wp-rocket/$http_host/$request_uri/.mobile-active";

# Do not bypass if it's a POST request
if ($request_method = POST) {
    set $rocket_bypass 0;
    set $rocket_reason "POST request";
}

# Do not bypass if arguments are found (e.g. ?page=2)
if ($is_args) {
    set $rocket_bypass 0;
    set $rocket_reason "Arguments found";
}

# Do not bypass if the site is in maintenance mode
if (-f "$document_root/.maintenance") {
    set $rocket_bypass 0;
    set $rocket_reason "Maintenance mode";
}

# Do not bypass if one of those cookie if found
# wordpress_logged_in_[hash] : When a user is logged in, this cookie is created (we'd rather let WP-Rocket handle that)
# wp-postpass_[hash] : When a protected post requires a password, this cookie is created.
if ($http_cookie ~* "(wordpress_logged_in_|wp\-postpass_|woocommerce_items_in_cart|woocommerce_cart_hash|wptouch_switch_toogle|comment_author_|comment_author_email_)") {
    set $rocket_bypass 0;
    set $rocket_reason "Cookie";
}

if (-f "$rocket_mobile_detection") {
    set $rocket_bypass 0;
    set $rocket_reason "Specific mobile cache activated";
}

# Do not bypass if the cached file does not exist
if (!-f "$rocket_file") {
    set $rocket_bypass 0;
    set $rocket_reason "File not cached";
}

# If the bypass token is still on, let's bypass WordPress with the cached URL
if ($rocket_bypass = 1) {
    set $rocket_is_bypassed "Yes";
    set $rocket_reason "$rocket_url";
}

# Clear variables if debug is not needed
if ($rocket_debug = 0) {
    set $rocket_reason "";
    set $rocket_file "";
}

# If the bypass token is still on, rewrite according to the file linked to the request
if ($rocket_bypass = 1) {
    rewrite .* "$rocket_url" last;
}

# Add header to HTML cached files
location ~ /wp-content/cache/wp-rocket/.*html$ {
    add_header Vary "Accept-Encoding, Cookie";
    add_header X-Rocket-Nginx-Bypass $rocket_is_bypassed;
    add_header X-Rocket-Nginx-Reason $rocket_reason;
    add_header X-Rocket-Nginx-File $rocket_file;
    #add_header Strict-Transport-Security "$rocket_hsts_value";
    expires 30d;
    #!# HEADER_HTTP #!#
    #!# HEADER_NON_GZIP #!#
}

# Do not gzip cached files that are already gzipped
location ~ /wp-content/cache/wp-rocket/.*_gzip$ {
    gzip off;
    types {}
    default_type text/html;
    add_header Content-Encoding gzip;
    add_header Vary "Accept-Encoding, Cookie";
    add_header X-Rocket-Nginx-Bypass $rocket_is_bypassed;
    add_header X-Rocket-Nginx-Reason $rocket_reason;
    add_header X-Rocket-Nginx-File $rocket_file;
    #add_header Strict-Transport-Security "$rocket_hsts_value";
    expires 30d;

    #!# HEADER_HTTP #!#
    #!# HEADER_GZIP #!#
}

# Debug header (when file is not cached)
add_header X-Rocket-Nginx-Bypass $rocket_is_bypassed;
add_header X-Rocket-Nginx-Reason $rocket_reason;
add_header X-Rocket-Nginx-File $rocket_file;

# No HSTS header added here. We suppose it's correctly added in the site configuration

###################################################################################################
# BROWSER CSS CACHE
#
location ~* \.css$ {
    gzip_vary on;
    expires 30d;

    #!# HEADER_CSS #!#
}

###################################################################################################
# BROWSER JS CACHE
#
location ~* \.js$ {
    gzip_vary on;
    expires 30d;

    #!# HEADER_JS #!#
}

###################################################################################################
# BROWSER MEDIA CACHE
#
location ~* \.(ico|gif|jpe?g|png|svg|eot|otf|woff|woff2|ttf|ogg)$ {
    expires 30d;

    #!# HEADER_MEDIAS #!#
}
2. Buka file konfigurasi nginx dari domain tersebut
Untuk menambahkan file, kamu perlu menentukan file konfigurasi web. Mimin memiliki cara sederhana untuk memeriksa setiap langkah-langkahnya dengan cara masuk ke terminal terlebih dahulu.
Kamu memasukkan perintah nginx -t untuk mengetesnya. Disini kamu akan melihat jalur file konfigurasi nginx.conf seperti yang ditampilkan pada gambar di bawah ini.

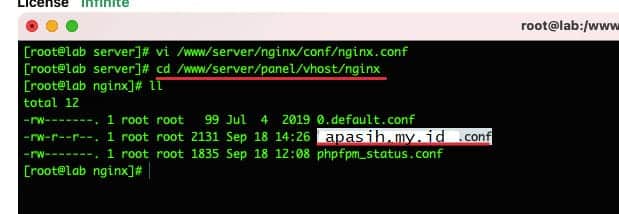
Kemudian masukkan perintah vi /www/server/nginx/conf/nginx.conf, Lalu scroll ke bawah dan temukan garis tambahkan seperti gambar yang digaris bawahi di bawah ini. Selanjutnya kamu akan melihat file konfigurasi yang ditambahkan seperti yang ditunjukkan pada gambar di bawah ini.
Catatan: Setiap tampilan control tentunya akan berbeda-beda, pasti kamu akan merasa bingung karena berbeda. Tapi ikuti saja langkah-langkah untuk menambahkan jalur yang benar, file yang ditampilkan di VPS kamu.
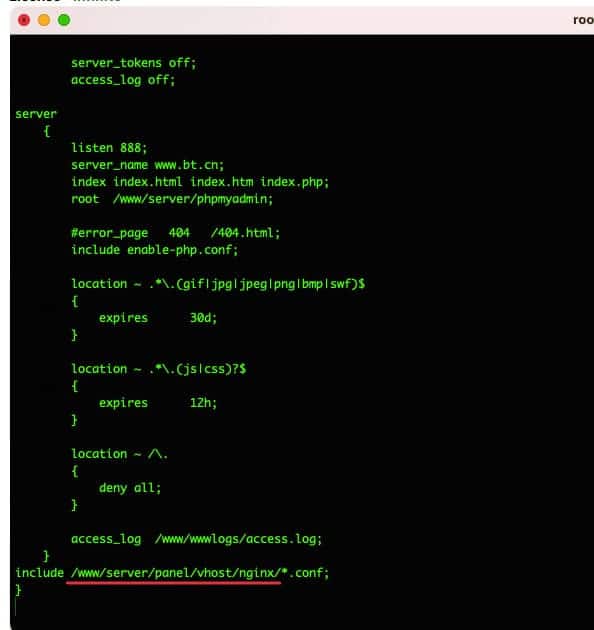
Langkah selanjutnya, ketikkan cd untuk masuk ke direktori nginx di atas dan menggunakan perintah ll untuk mendaftar. Di sini kamu akan melihat file konfigurasi web misalnya apasih.my.id.conf. Setelah kamu mengidentifikasi file tersebut, kamu perlu membuka file ini untuk menambahkan beberapa cuplikan kode.
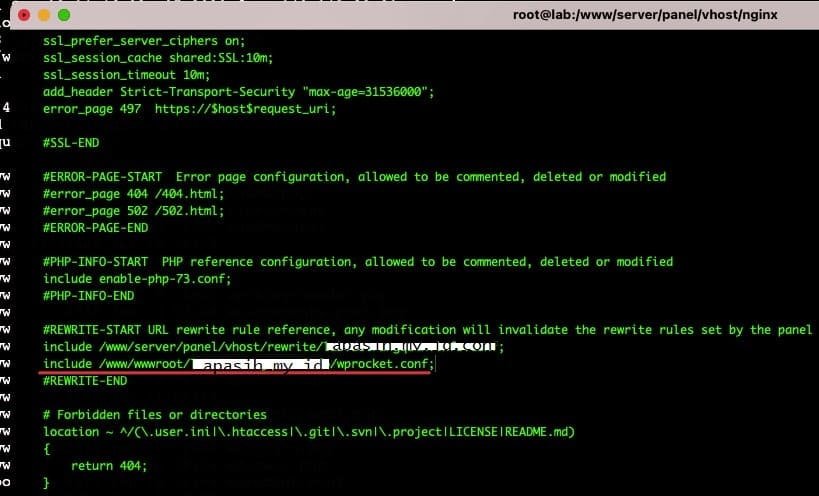
Silakan kembali ke cara pertama. Pada langkah 1, di jalur mana kamu membuat file konfigurasi, kamu akan mendeklarasikan jalur yang benar. Seperti pada langkah 1, ketika mimin membuat file /www/wwwroot/apasih.my.id/wprocket.conf, mimin akan menambahkan baris include <file path>
Misalnya: tambahkan include /www/wwwroot/apasih.my.id/wprocket.conf;
Catatan: Ingatlah untuk menambahkan titik koma ( ; ) di akhir baris, jika tidak kamu akan mendapatkan kesalahan sintaks.
Setelah itu simpan dan lakukan tes file tersebut untuk melihat apakah sudah benar. Gunakan perintah nginx -t. jika terlihat test is successful seperti gambar dibawah, itu tandanya telah berhasil.

Catatan : Jika pada nginx -t diatas melaporkan kesalahan sintaks, maka cari # baris berikut di file wprocket.conf.
#location / {
#try_files $ uri $ uri / /index.php?$args;
#}3. Lakukan Restart Server dan Periksa
Kembali ke situs web WordPress kamu dan hapus cache pada WP Rocket, agar memulai kembali preload cache.
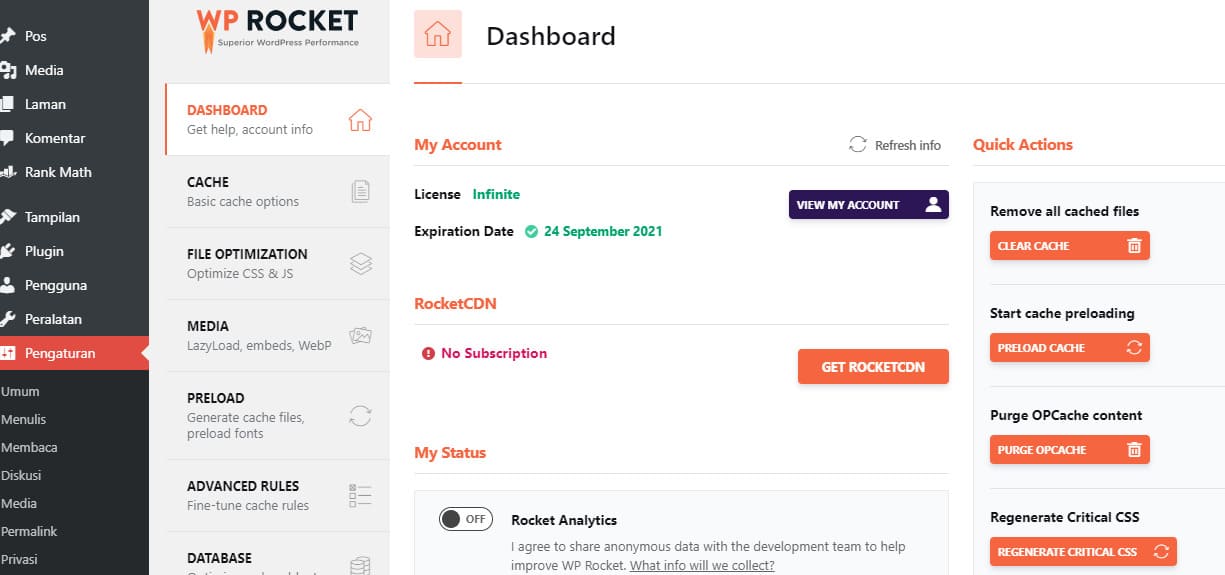
Setelah preload cache telah selesai, saatnya kamu periksa menggunakan browser dengan membuka debugger, lalu periksa pada headernya.

Jika kamu melihat X-Rocket-Nginx-Bypass : Yes, berarti tandanya kamu telah berhasil melakukan konfigurasi WP Rocket Nginx di aaPanel.


